Integrating ZooKeeper into a Docker environment can get tricky, if you consider clustering support and use Exhibitor for supervision. In this post, I’m documenting my own process with this stack, a customized Netflix image and a single boot2docker virtual machine as the hosting environment.
Update: The process gets significantly easier, when using docker-machine for virtual host management. Check it out here.
Running a single ZooKeeper instance
Let’s start by running a standalone Exhibitor container, using the NetflixOSS image from Docker Hub:
docker run \
  -d --name=exhibitor \
  -p 2181:2181 -p 2888:2888 -p 3888:3888 -p 8080:8080 \
  netflixoss/exhibitor:1.5.2
The image is set up to spawn a ZooKeeper instance and an Exhibitor process for supervision, which should be sufficient for most development purposes and for getting the feel of the service. Once the container is up, you can head to the Control Panel to confirm the status and explore the data.
To access the panel with boot2docker on Mac OS X:
DOCKER_IP=`boot2docker ip`
open http://${DOCKER_IP}:8080/exhibitor/v1/ui/index.html
To launch the ZooKeeper CLI in the running container:
docker exec -it exhibitor /zookeeper/bin/zkCli.shNote 1: You can use the minimal client from the last section of this article, to check connectivity from a Curator app (a popular ZooKeeper client for the JVM).
Note 2: You should remove the container once you’re finished, since we’re going to bind those ports in the next phase as well. Use docker rm -f exhibitor to do this in one step.
Running a ZooKeeper ensemble
Let’s add a high availability component by setting up an ensemble of nodes. As suggested by the ZooKeeper Administrator’s Guide, it will consist of five nodes, which will allow for two of them to fail, and still keep the service operational (a majority is required; check the guide for more details).
For demonstration purposes, we’re going to set them up on a single Docker instance, which will be running on the boot2docker virtual machine. This should never take place in production of course, but it should be enough for getting a high-level picture of the environment.
Preparing network interfaces on the Docker host machine
To emulate multiple Docker nodes on Mac OS X, we’re going to add some additional IP addresses to the boot2docker virtual machine. That way, we can associate each node in the ZooKeeper ensemble with a unique IP and provide a clear hostname mapping later.
Let’s start by finding out the network interface and the IP address, which are used by the virtual machine:
$ boot2docker ssh ifconfig | grep -C 1 `boot2docker ip`
eth1      Link encap:Ethernet  HWaddr 08:00:27:28:37:7B
          inet addr:192.168.59.103  Bcast:192.168.59.255  Mask:255.255.255.0
          inet6 addr: fe80::a00:27ff:fe28:377b/64 Scope:Link
As you can see, my boot2docker VM is talking over eth1/192.168.59.103. Let’s add some additional IPs to this interface:
#!/bin/bash
HOST_COUNT=5
for ((i = 1; i<=$HOST_COUNT; i++)) do
  IP=192.168.59.$((200 + i))
  boot2docker ssh sudo ifconfig eth1:${i} ${IP} netmask 255.255.255.0 up
done
Once you run the script, make sure that you can access the VM using all 5 IPs.
Preparing a custom Docker image for Exhibitor
An Exhibitor installation can use one of the several config types, which will imply the storage solution for sharing configuration within the cluster. For example, you could store your cluster config in an Amazon S3 bucket, in an external ZooKeeper server or using a shared property file on a dedicated filesystem.
In any case, you’ll need some sort of customization for the Exhibitor container, since the base image isn’t production ready for the moment. For these reasons, we’re going to modify the base Docker image and setup a shared property file, which will handle the distributed config management.
Start by fetching the base Netflix template from GitHub:
git clone https://github.com/Netflix-Skunkworks/zerotodocker.git
cd zerotodocker/exhibitor-zookeeper/
Open the Dockerfile and add a --fsconfigdir switch as shown below:
ENTRYPOINT ["java", "-jar", "exhibitor-1.0-jar-with-dependencies.jar", "-c", "file", "--fsconfigdir", "/exhibitor/shared"]You can replace /exhibitor/shared with any reasonable location, as long as it stays consistent with the volume switch in docker run.
Build a new image using the modified Dockerfile:
docker build -t my-exhibitor .Create a base config file for Exhibitor
Copy the property file from the Git repository to a shared directory on the boot2docker virtual machine:
scp -i ~/.ssh/id_boot2docker -P 2022 exhibitor.properties  docker@localhost:/home/docker/
boot2docker ssh sudo mkdir -p /etc/exhibitor
boot2docker ssh sudo mv /home/docker/exhibitor.properties /etc/exhibitor/exhibitor.properties
Spawning Exhibitor instances using Docker
Finally, we can start spawning our ensemble:
#!/bin/bash
HOST_COUNT=5
HOST_MAPPINGS=""
# Prepare host-to-ip mappings for all Docker containers
for ((i=1; i<=$HOST_COUNT; i++)) do
HOST_MAPPINGS="$HOST_MAPPINGS --add-host exhibitor${i}:192.168.59.$((200+i))"
done
# Remove existing containers
for ((i=1; i<=$HOST_COUNT; i++)) do
docker rm -f exhibitor${i}
done
# Start Exhibitor containers
for ((i=1; i<=$HOST_COUNT; i++)) do
INSTANCE_HOST=exhibitor${i}
INSTANCE_NAME=exhibitor${i}
INSTANCE_IP=192.168.59.$((200+i))
docker run \
$HOST_MAPPINGS \
-d -h $INSTANCE_HOST --name=$INSTANCE_NAME \
-p $INSTANCE_IP:2181:2181 \
-p $INSTANCE_IP:2888:2888 \
-p $INSTANCE_IP:3888:3888 \
-p $INSTANCE_IP:8080:8080 \
-v /etc/exhibitor:/exhibitor/shared \
my-exhibitor
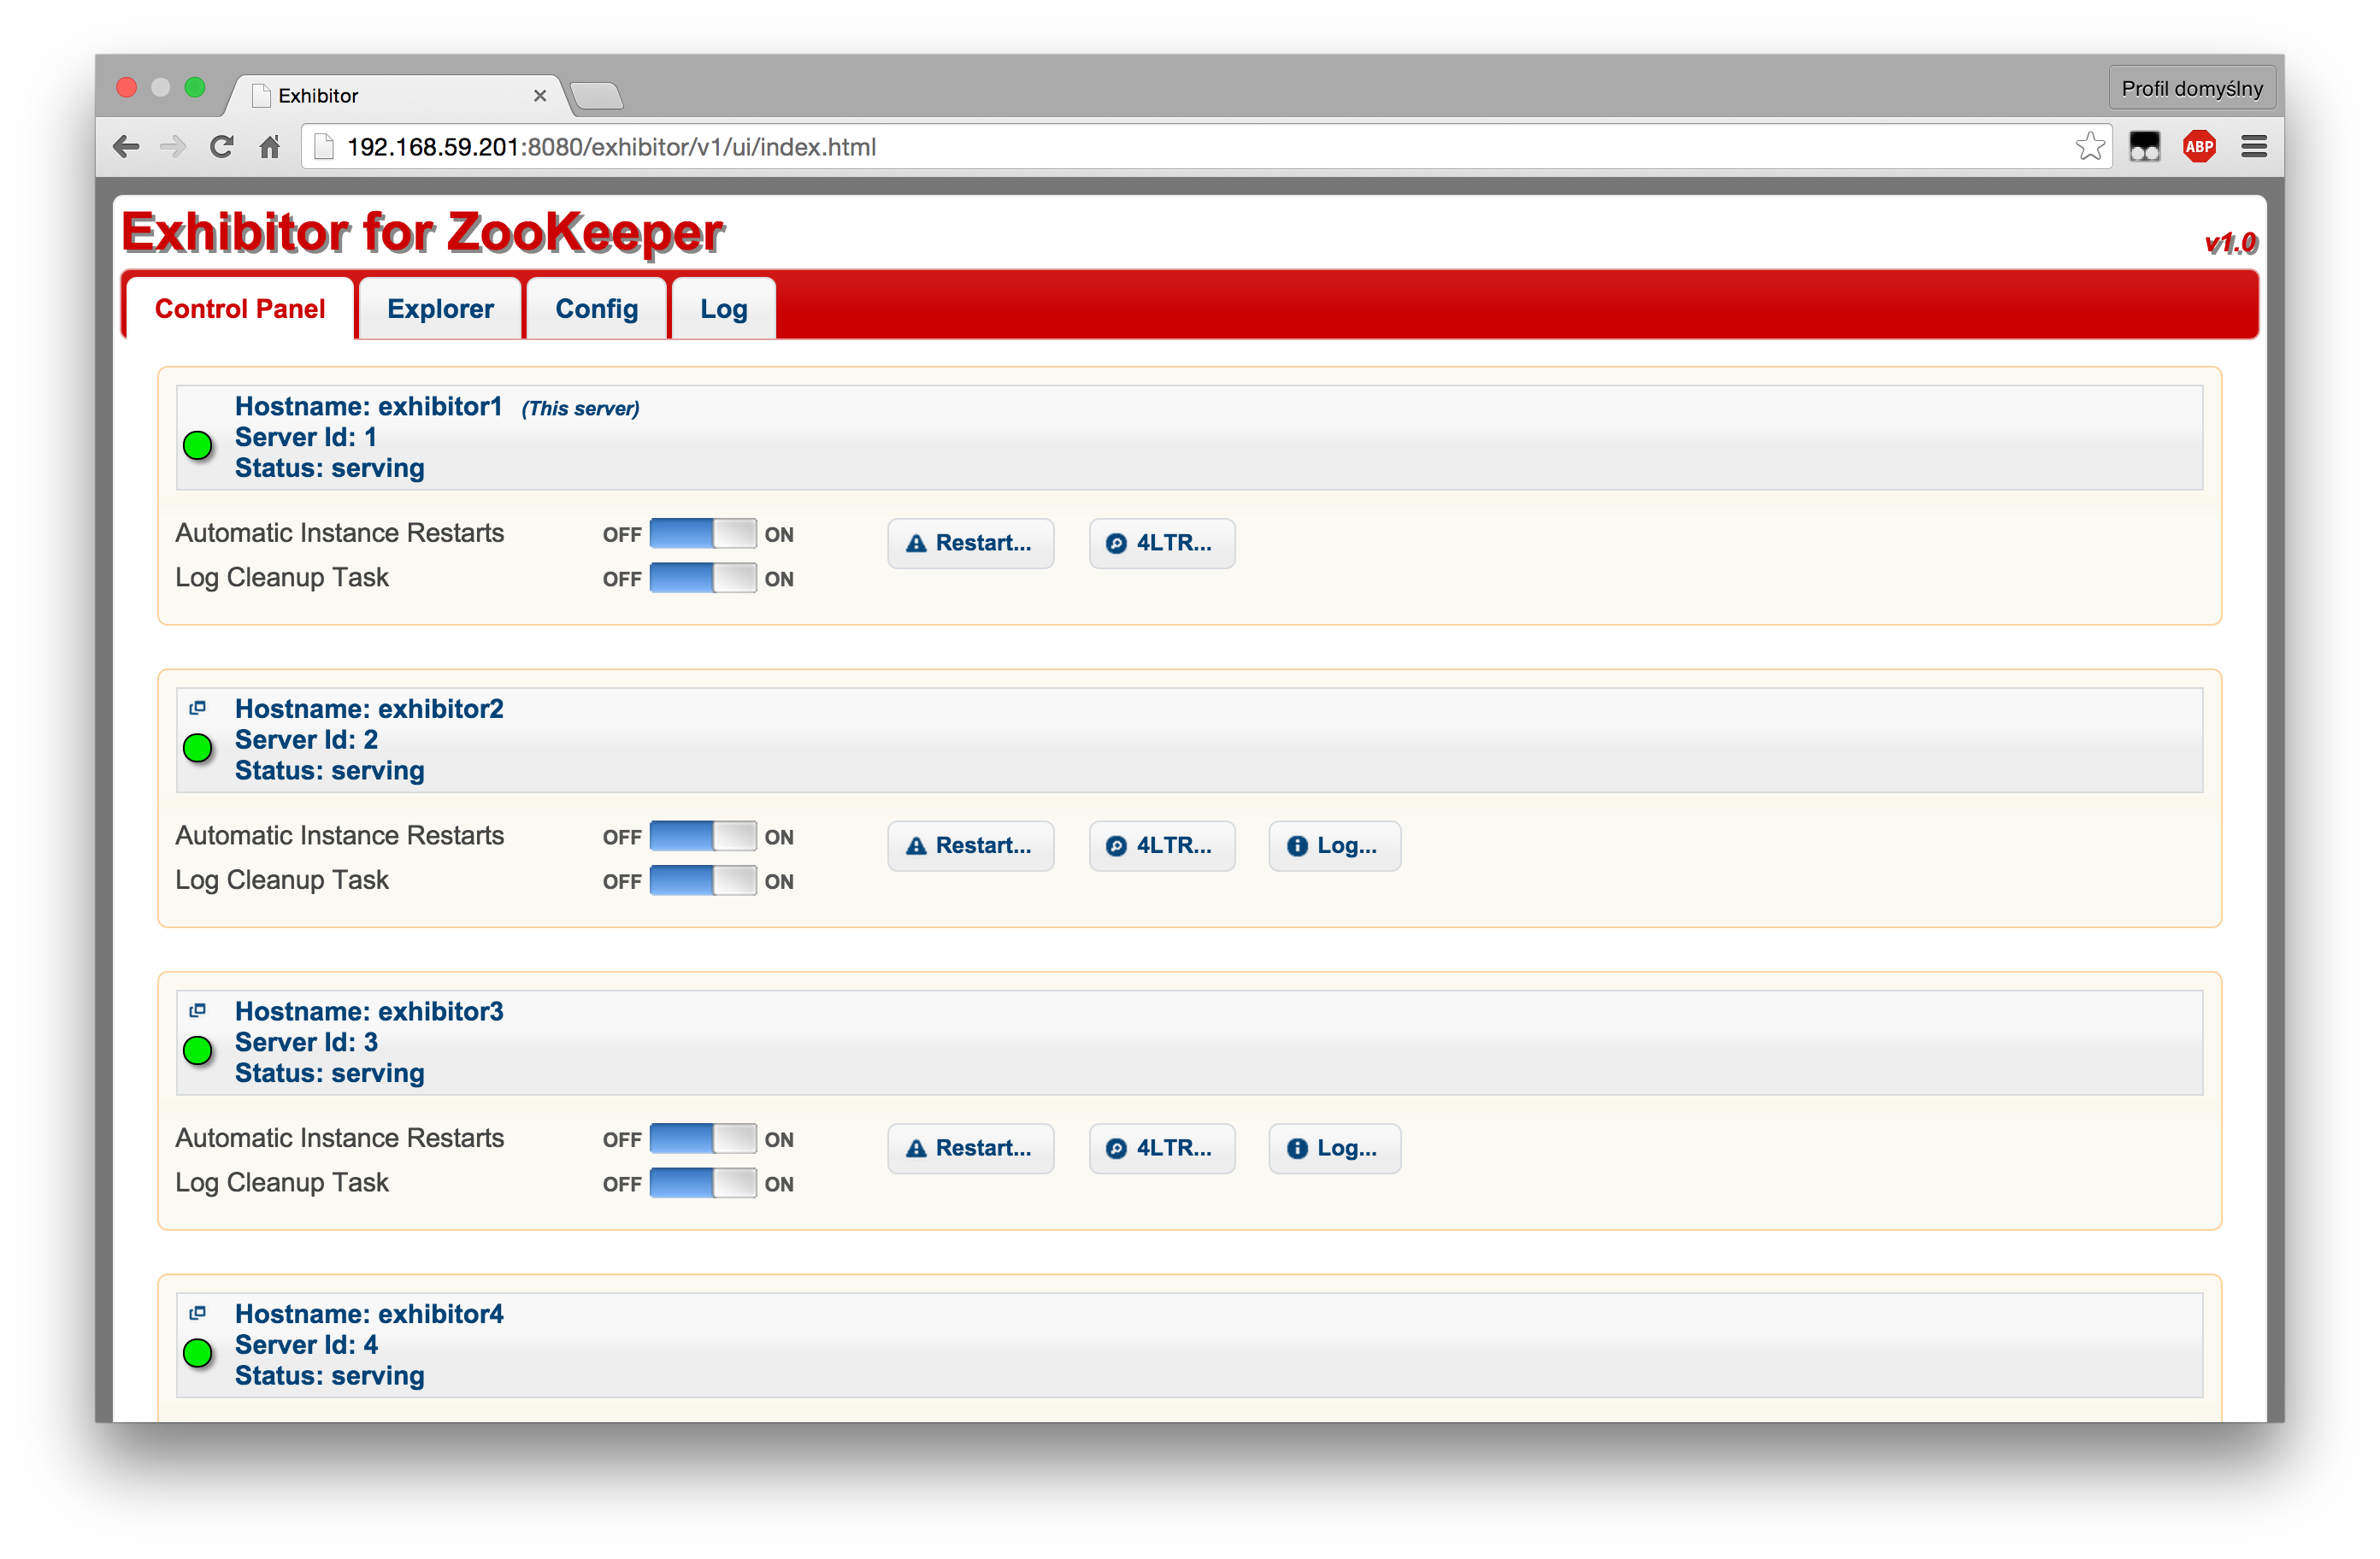
doneOnce the script is finished and all instances are up and running, you can proceed with the clustering setup. Open the Control Panel on exhibitor1:
open http://192.168.59.201:8080/exhibitor/v1/ui/index.html… and set the Config -> Ensemble -> Servers section to the following value:
S:1:exhibitor1,
S:2:exhibitor2,
S:3:exhibitor3,
S:4:exhibitor4,
S:5:exhibitor5
Click Commit -> All at once and wait. Once the config gets updated, you should see a complete list of servers with a green status icon next to each item:
Keep in mind, that the initial startup may take some time. If you’re impatient or something goes wrong, use the logs command to see what’s going on inside a container (e.g. docker logs -f exhibitor1).
Testing connectivity from a standalone application
You can use the following Scala template to check: connectivity, replication, node failures and possibly other cases, that may require a standalone client.
Just clone the repository and launch sbt ~run in the root directory of the project.
Please note, that if a znode is created using the EPHEMERAL mode, then it will be available for the active session only. You may want to change this, depending on your test case requirements. Check Curator and ZooKeeper docs for more information regarding ephemeral nodes and the client implementation itself.
Conclusions
This is my first technical post, so thanks for getting this far :-) If you have any remarks or suggestions, then please feel free to send me an e-mail or leave a comment below.